


Soft Sweet Potato Rolls Recipe
Note- This post may contain affiliate links, we earn from qualifying purchases made on our website. If you make a purchase through links from this website, we may get a small share of the sale from Amazon and other similar affiliate programs.
Sweet potatoes are extremely versatile, and an important part of a Thanksgiving spread. How about using these sweet potatoes and, instead of making regular dinner rolls, serving sweet potato rolls for Thanksgiving? Let us see how easily these delicious bread rolls can be made!
Sweet potato rolls are actually quite delicious. Although they do have a similar bready and spongy texture as normal bread rolls do, what sets them apart is the flavor. The sweet potato actually helps add a subtle sweetness to the rolls, which overall works really well.
It truly is the best accompaniment to some smoked turkey and other sides for Thanksgiving. But honestly, Thanksgiving isn’t all that these rolls can be made for! Even for regular dinners, these rolls can be a great upgrade to the usual dinner rolls.
It may sound like too much to make bread from scratch, but it really isn’t that hard. Yes, there are certain technicalities that need to be taken into account, of course, as baking needs precision. However, once you get the hang of it, you will end up realizing how fun and relaxing baking can be!
Plus, nothing can really beat the aroma of freshly baked goods, am I right? If you want your kitchen to end up smelling like a Parisian bakery, then you surely need to give this recipe a try! Moreover, I have tried to simplify the ingredients as much as possible so that the recipe can be more time efficient.
In this article, you will get a step-by-step guide to understanding how you can make these rolls. Starting from the equipment that you will need, to the time, ingredients, method, and nutritional values, it is all in this article! So, let’s get baking!
What’s In The Post
What Equipment Will You Need To Make Sweet Potato Rolls?
- Bowl – You will need two bowls for this recipe, a small one and a large one. The small one is to activate the yeast, and the large one will be to sift in the flour and other dry ingredients.
- Sieve – To make sure that the dough does not end up having any lumps, it is important to sift the flour first, for which you will need a large sieve.
- Measuring Cups – Baking is all about being precise with your measurements, so measuring cups will be really handy for that.
- Measuring Spoons – To measure some of the ingredients that will be needed in much smaller amounts, measuring spoons will be needed.
- Stand Mixer – A stand mixer will be needed to bring the dough together initially. This is especially important if you aren’t used to baking as making the dough by hand will eventually hurt your arms. You will also need a paddle and hook attachment with the stand mixer.
- Plastic Wrap – While the dough is proofing, you will have to cover it with plastic wrap so that it does not develop skin on top.
- Dough Scraper – A dough scraper will be handy as you will be transferring the dough from the bowl to a different surface. It will also be a handy tool while you divide the dough.
- Pastry Brush – Once the rolls are out of the oven, we will brush the tops with some melted butter to give them extra flavor. For that, you will need a pastry brush.
- Baking Tray – You will need a large baking tray on which you can place the rolls, and further bake them.
- Parchment Paper – We won’t be placing the rolls directly onto the tray as that increases the chances of them sticking to it while baking. So, you will need some parchment paper. You can also alternatively use a silicone mat.
How Much Time Will You Need To Make Sweet Potato Rolls?
| Preparation Time | Resting Time | Baking Time | Total Time |
| 1 Hour | 1 Hour 30 Minutes | 30 Minutes | 3 Hours |
What Ingredients Will You Need To Make Sweet Potato Rolls?
- All-Purpose Flour – To make these rolls, all-purpose flour is the best bet, as they have the perfect gluten content. You will need 3 cups to make a dozen rolls.
- Sweet Potato Puree – You will need ¾ cup of sweet potato puree to make these rolls. You can use unsweetened, canned sweet potato puree to make them. However, in case you have leftover boiled sweet potatoes, you can make a thick puree at home by pulsating them with some water and then using that instead.
- Active Dry Yeast – The active dry yeast will help the rolls rise while they are proofing, so you will need two tablespoons of the same.
- Eggs – Eggs will help bring the whole mixture together and also give it a structure. For this recipe, you will need a single large egg.
- Butter – There is no baked good without fat, right? Butter will give these rolls an irresistible flavor, so you will need four tablespoons of melted, salted butter. Out of the four tablespoons, three will be used to make the dough, and one tablespoon will be used to brush the tops of the rolls once they are out of the oven.
- Buttermilk – We will be using buttermilk to activate the dry yeast, so you will need ½ cup of warm buttermilk. Make sure that the temperature of the buttermilk is not above 110 degrees Fahrenheit.
- Sugar – You will need sugar to add flavor to the rolls and also to activate the yeast. 1 ½ tablespoon of granulated sugar or even caster sugar will be enough.
- Salt – Lastly, to enhance all the flavors in the sweet potato rolls, you will need a single teaspoon of salt.
Steps To Make Sweet Potato Rolls
1. Prepare The Dough
The first step while making these rolls is to prepare the dough. For that, first add the yeast to the warm buttermilk in a large bowl, along with half the sugar. Keep it aside and let the yeast rise. Meanwhile, you can start working on the rest of the ingredients.
In a stand mixer bowl, add egg, sweet potato puree, sugar, salt, and melted butter and whisk until everything is combined. Then add in the yeast and buttermilk mixture and whisk again till everything comes together.
Then while using the paddle attachment, start adding the flour to the wet ingredients, a single cup at a time. Once you add the first cup and it’s all incorporated together, the dough will start getting a little sticky. This is when you change the attachment from a paddle to a hook.
Then keep adding the rest of the flour while mixing the dough together with the hook attachment until everything is combined together. Once the dough begins to form, transfer it onto a floured surface and start kneading.
Knead the dough thoroughly until it is not dry anymore and has an elastic consistency. Once you are done kneading, place the dough in a large bowl that is oiled, and cover the dough with some oil too. Cover the bowl with plastic wrap and let it rise for one hour.
2. Divide And Shape The Dough
Once the one-hour mark is over, you will see that the dough has risen to double its size, which is perfect. Then take the dough out of the bowl onto a floured surface and knock it back a little against the surface just so that some of the excess air bubbles can escape.
Once you are done with that, divide the dough into two halves and then start cutting out small portions from each half. You should easily be able to get a dozen rolls from this much dough. Roll the dough and make sure they have smooth tops.
Once the dough is rolled, start placing the little rolls on the baking tray that is lined with either parchment paper or a silicone mat. Cover the rolls with plastic wrap and let them rest for 20-25 minutes.
3. Bake And Serve
While the rolls are resting, you can preheat the oven to 400 degrees Fahrenheit so that by the time the rolls are done resting, the oven will be sufficiently hot. After the 25 minutes are done, place the baking tray in the oven and let the rolls bake for 20 minutes at the same temperature.
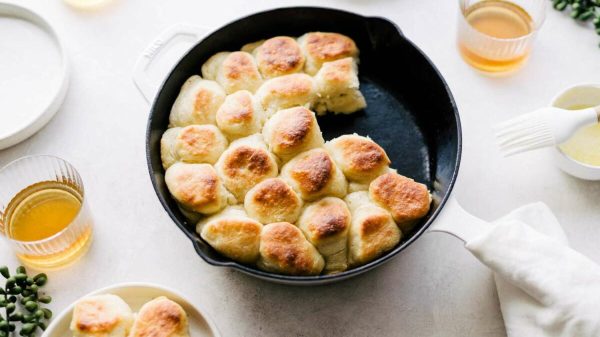
The tops of the rolls should be golden brown once they are done. Once they are out of the oven, let them cool for 10-15 minutes, as otherwise, the insides might feel a little gummy in texture. Brush the tops of the rolls with melted butter, sprinkle some sea salt if you would like, and serve with your favorite dishes!
How Can Sweet Potato Rolls Be Served?
- As An Accompaniment For Thanksgiving Dinner – Starting with the most obvious way to serve them, sweet potato rolls go really well with turkey and also the rest of the dishes that you will find on a Thanksgiving spread.
- With Condiments – These rolls are so delicious and soft, especially when they are hot! In fact, so much so that you don’t really need anything but some condiments to accompany them! Jams, marmalades, hot honey, and butter make great condiments to go with sweet potato rolls.
- On A Charcuterie Board – Surprisingly, or maybe not, these rolls go really well with most cold cuts and different types of cheese, so they will surely fit well on a Charcuterie board.
- As A Breakfast Sandwich – Instead of making breakfast sandwiches with slices of bread, you can make delicious ones with sweet potato rolls. They work exceptionally well with bacon and eggs.
- As French Toast – Another innovative way to serve up a hearty breakfast is by making french toast with sweet potato rolls. The subtle sweetness of the rolls combined with cinnamon and sugar make a great combination.
Nutritional Information
| Calories | 133 kcal |
| Fat | 3 grams |
| Saturated Fat | 1 gram |
| Carbohydrates | 23 grams |
| Fiber | 1 gram |
| Sugar | 3 grams |
| Protein | 4 grams |
| Sodium | 169 milligrams |
| Potassium | 57 milligrams |
| Cholesterol | 21 milligrams |
| Vitamin C | 0 milligrams |
| Calcium | 10 milligrams |
| Iron | 1 milligram |
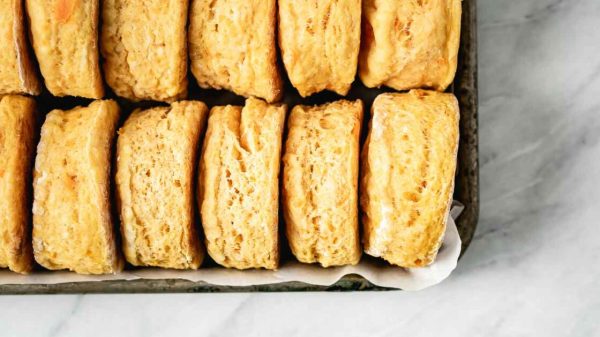
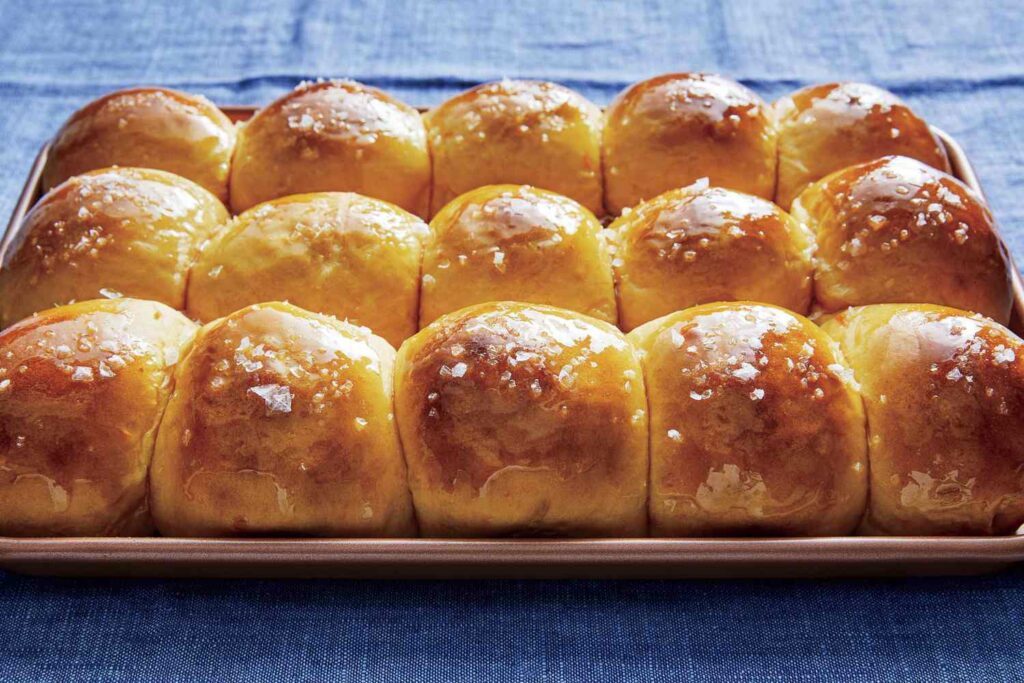
How Will The Sweet Potato Rolls Look And Taste Like?
Baking is surely a tough task, especially if you are new to it. I don’t know about everyone, but during my initial days of baking, I was always worried and constantly anticipating what the final product was supposed to look like. I didn’t really get an answer to that, but I sure will provide one to you, to make it easier and let go of the jitters!
The sweet potato rolls will look like a much darker version of regular dinner rolls. They will have perfectly crispy and golden brown tops, which will shine once they are brushed with some melted butter, creating the perfect glaze. You can also create fun shapes while rolling out the dough to make the rolls look even more attractive.
The rolls will be soft and spongy when we talk about their texture of them. Finally, coming down to the flavor, they will have a very nice balanced flavor. The rolls will be savory for sure; however, once you begin chewing them, there will be an underlying sweetness that will hit you, which actually creates a great balance.
Recipe Card
Sweet Potato Rolls Recipe
#wprm-recipe-user-rating-0 .wprm-rating-star.wprm-rating-star-full svg * { fill: #e51838; }#wprm-recipe-user-rating-0 .wprm-rating-star.wprm-rating-star-33 svg * { fill: url(#wprm-recipe-user-rating-0-33); }#wprm-recipe-user-rating-0 .wprm-rating-star.wprm-rating-star-50 svg * { fill: url(#wprm-recipe-user-rating-0-50); }#wprm-recipe-user-rating-0 .wprm-rating-star.wprm-rating-star-66 svg * { fill: url(#wprm-recipe-user-rating-0-66); }linearGradient#wprm-recipe-user-rating-0-33 stop { stop-color: #e51838; }linearGradient#wprm-recipe-user-rating-0-50 stop { stop-color: #e51838; }linearGradient#wprm-recipe-user-rating-0-66 stop { stop-color: #e51838; }
-
Add yeast to a large bowl with warm buttermilk and half the sugar and keep it aside.
-
In a stand mixer bowl, add the egg, sweet potato puree, sugar, salt and melted butter and whisk till everything is combined.
-
Add a single cup of flour to the wet ingredients along with the salt, while mixing with the paddle attachment.
-
Once the flour is incorporated into the wet ingredients, change the attachment to a hook attachment and keep adding flour, bit by bit until everything is combined and the dough stops sticking to the sides of the bowl.
-
Transfer the dough onto a floured surface and start kneading it until it isn’t dry and has an elastic consistency.
-
After the dough reaches the desired texture, place it in a bowl that is greased with oil and also add some oil on top of the dough. Cover the dough with plastic and let it rise for 1 hour in a warm place.
-
Once the dough has risen to double its size, transfer it to a floured surface and knock it back slightly.
-
Divide the dough into two halves and cut out six portions from each half.
-
Roll the dough properly into a smooth ball and transfer it to a baking tray that is lined with parchment paper.
-
Cover the rolls with plastic wrap and let them rise for 30 minutes.
-
Meanwhile, preheat the oven at 400 degrees Fahrenheit.
-
After the bread rolls are done rising, place the baking tray in the oven and bake the rolls for 20 minutes at the same temperature.
-
Once done, take them out of the oven and let them rest for 10-15 minutes.
-
Brush the tops with some melted butter and serve with your favorite sides.
Frequently Asked Questions (FAQs)
Can fresh sweet potatoes be used instead of canned puree to make these rolls?
Yes, you can use freshly boiled sweet potatoes and make a puree at home with water, to make these rolls.
Can this same recipe be used to make pumpkin rolls?
Yes, you can use the same recipe to make pumpkin rolls too. Just replace the sweet potato puree with the same quantity of pumpkin puree.
Why do we need to rest the dough twice?
The reason behind resting the dough twice is simply that the longer you rest the dough, the more it will rise and create soft rolls.
Why does the dough have to be covered while it is proofing?
The reason behind covering the dough both times while proofing is just so that the top of the dough does not form a skin while it gets in contact with the air for a long time.
Are sweet potato rolls healthy?
Yes, these rolls are surely healthier than regular dinner rolls, as sweet potatoes are pretty rich in macro and micronutrients.
Can self-raising flour be used in place of all-purpose flour for this recipe?
No, self-raising flour cannot be used in this recipe as it has added baking powder, and the leavening agent we are using here is yeast.
How long can sweet potato rolls be stored?
If stored properly in an airtight container at room temperature, the rolls should last for 3-4 days.
Can sweet potato rolls be refrigerated?
Yes, sweet potato rolls can be refrigerated. However, it is not recommended to do so, as refrigeration might dry them out.
Conclusion
Perfectly soft and spongy sweet potato rolls are extremely versatile and go with a lot of other dishes as an accompaniment. The subtle sweetness of the sweet potato works really well with the savory flavor of the dough, creating a wonderful overall bread roll.